This article is all about brute force attacks on wp-login.php and how you can be protected from it. A brute force attack is the type of hacking attack in which hackers try to login by continuously trying a different set of password combinations. If you are not using a strong password, they can easily break it and take control of your website.
Now the question arises, how protect yourself from brute force attacks on wp-login?
The answer is by changing the default login URL. Hackers need to have a login page to start with the brute force attack. You can change the default login URL “/wp-admin” and be one step ahead.
Below we have shared everything on how to avoid brute force attacks on wp-login.php file.
Before going to start with the actual post, here are the few quick tips
- It would be best if you use a strong password. Your password should be 12+ characters containing upper and lower-case letters combined with numbers, punctuation, or non-alphanumeric symbols.
- You should change the default login URL.
- Always install a good security plugin.
- Setup Cloudflare DNS level protection.
- It is essential to set a failed login limit, that means when anyone tries to log in multiple times, your system will detect and block the IP.
Table of Contents
Change The Login URL
You can change the login URL of WordPress in two different ways. By installing a plugin and manually my making changes in core WordPress files. Below we have shared step by step instructions for both.
1. How To Change The Login URL Through Plugin?
For changing the login URL, you need to install a free plugin called WPS Hide Login. You can easily install it from the WordPress plugin library. Follow the below instructions carefully to be done with it.
Step 1: First, you have to install the plugin, login to your WordPress dashboard.
Step 2: Go to Plugins >> Add New >> Then search for WPS Hide Login >> Once you get the plugin to click on install, then activate it.
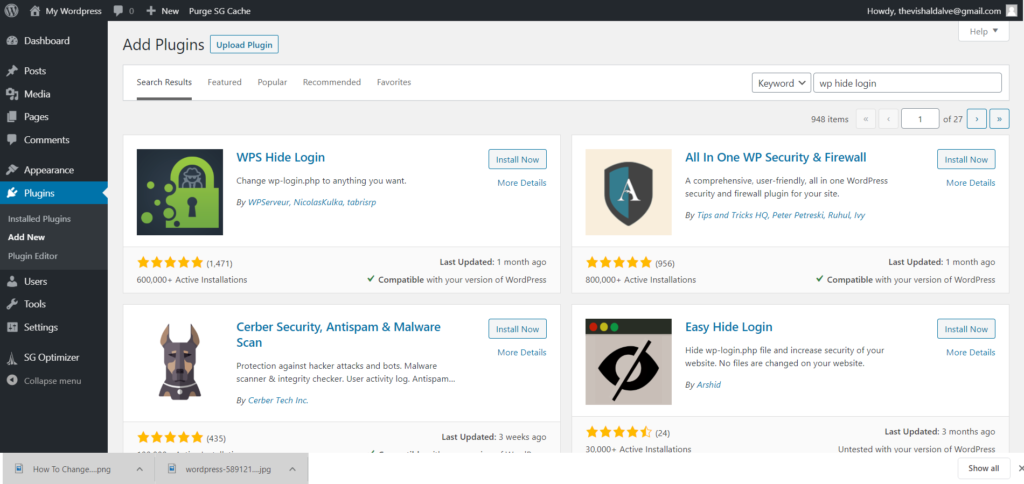
When you install this plugin, remember one thing. It will automatically change your login URL from /wp-admin to /login, so if you did not configure it after installing, then for next time, you have to visit /login to login to your website.
Step 3: To configure the plugin, Go to Settings >> General. Scroll down, at the end of the page, you will get the option to set your custom login URL, enter it and click on Save.
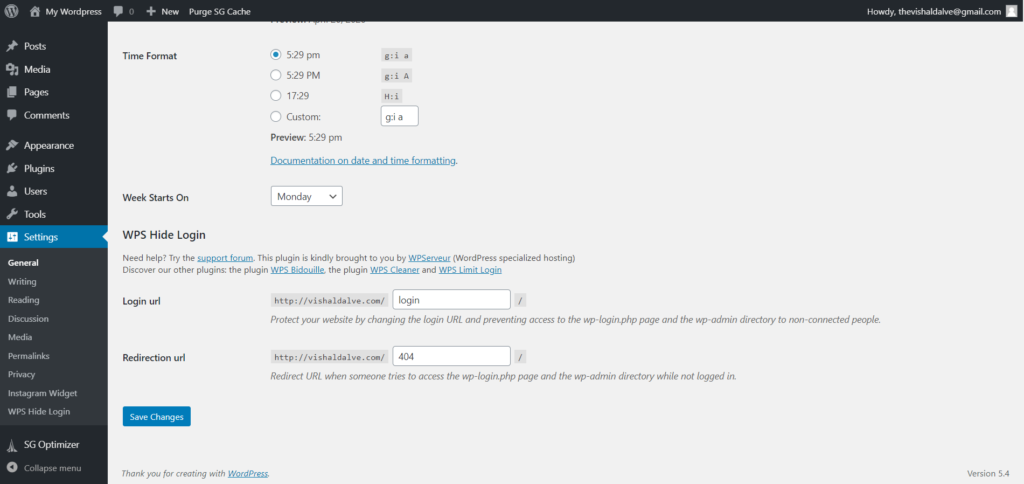
That’s how you can easily change the WordPress login URL with the help of a free plugin. WPS Hide Login is not the only plugin that allows you to change the login URL. There are tons of free plugins are also available. Few bests of them are,
- Easy Hide Login
- Custom Login Page Customizer | LoginPress
- WP Hide & Security Enhancer
- Hide login page, Hide wp-admin – stop the attack on the login page
You are free to use any plugin.
2. How To Manually Change The Login URL?
Manually changing the login URL is quite a tricky process. It will be very challenging for you if you are not a web developer or tech-savvy guy. Below we have explained everything most easily, follow the instructions carefully.
First, make sure you have a code editor (ex. Notepad++) on your system. Most are free to download.
If your website is hosted on managed WordPress hosting, then you can’t change the login URL manually. In that case, you need to resort to using a plugin.
If you have FTP access or File manager of the hosting, proceed with the steps below:
To change the login URL, we have to make changes in the wp-login.php file that handles the login page & all the login requests.
Step 1: Log in to your host or FTP account.
Step 2: Locate where you have installed WordPress for the particular website. If there is only one website hosted, then you will find the installation in public_html.
Step 3: Go to public_html and download wp-login.php. You can also edit this file online, for that right-click on it and click on the edit option.
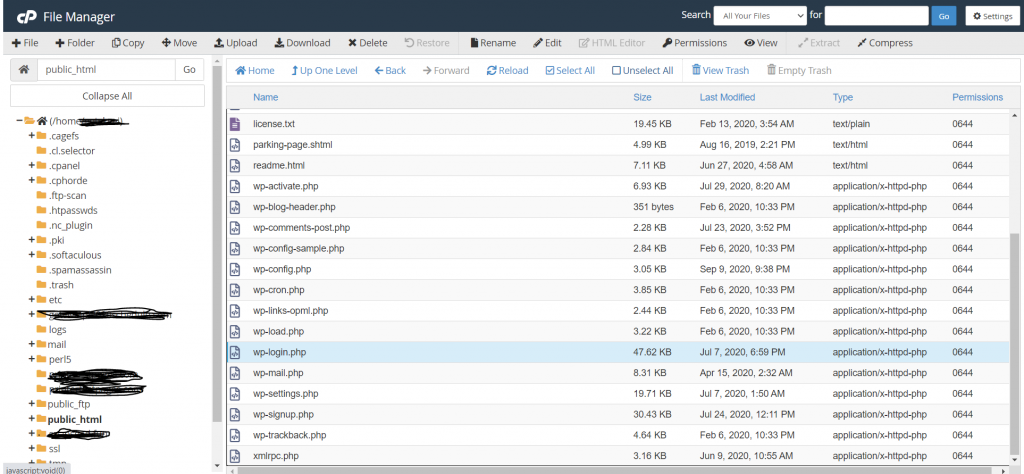
Make sure you have taken a backup of the file before making any changes.
Step 4: Open the downloaded file in the code editor, go to Find option (Ctrl+F), and search for “wp-login”
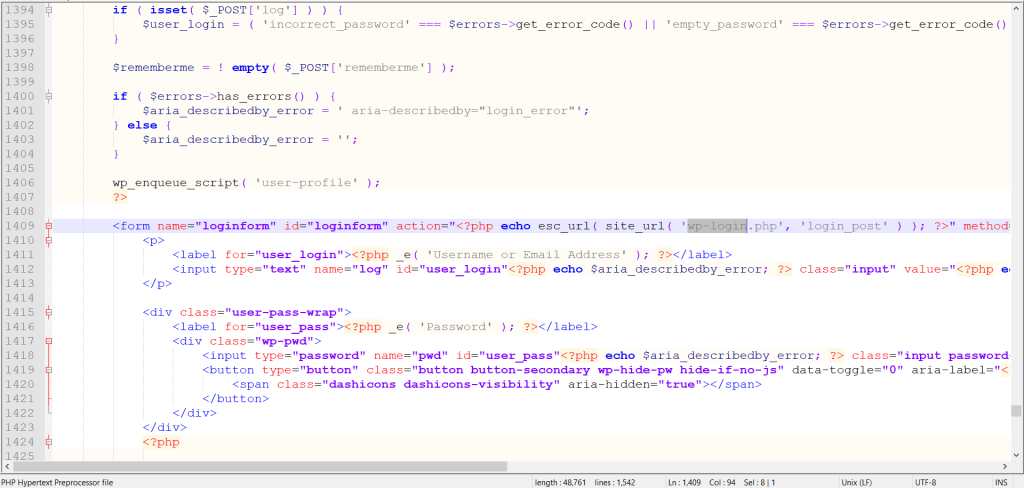
Step 5: Now, Replace “wp-login” with your desired login URL (For example “wp-design-login”) and save the file.
Step 6: Rename the downloaded file with your desired login URL that means change the file name from “wp-login.php” to “wp-design-login.php”
Step 7: Now delete the existing “wp-login.php” file from your server and update the new one, which is “wp-design-login.php” and you are done.
That’s how you can change the WordPress login URL manually.
Install Security Plugin (iThemes Security)
Security plugin also plays an important role to avoid brute-force attacks on the wp-login.php file. There are tons of free or paid security plugins available out there. And iThemes security is best among them.
iThemes security is the freemium security plugin that allows you to entirely protect your WordPress website not just from the brute force but also from tons of other hacking attacks.
Talking about its brute force protection, you will get next-level security in it. This plugin will automatically ban the users who have tried to log in with various password combinations.
After installing the plugin, you don’t have to do anything. The plugin will automatically report the IP address of failed login attempts and block them for the next few weeks.
You can use iThemes Security for free, but for a few premium security features, you need to purchase their premium version. The premium version will cost you around $80 per year for one website.
If you own multiple websites, you can go with the Gold plan, which will cost you about $199 per year for unlimited websites.
Configuring the iThemes Security Plugin
Step 1: First of all, install the plugin, for that Login to your WordPress website >> Go to Plugin >> Add New >> Search for iThemes Security >> Once you get the plugin Click on Install >> Then Activate it.
Step 2: Once you activate the plugin, you will see a new Security option. Click on that, go to Security settings.
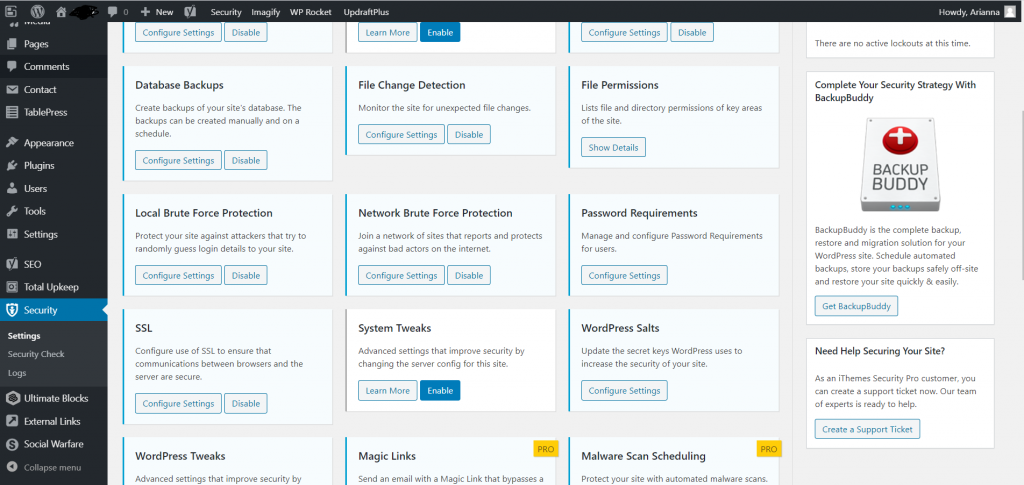
Step 3: This is an all-in-one security plugin, but you will get tons of options to configure here, but for now, search for “Network Brute Force Protection” click on Configure, and set it up.
If now anyone tries to login forcefully, this plugin will automatically block the IP.
Restrict WordPress Site Access by IP or Logged In Users (Restricted Site Access)
For added security, you can restrict the access to your website’s login page for everyone. Only the selected IP and devices can visit it and log in to your websites.
IP restriction will be the final and most secure layer of security for your WordPress website. Follow the below steps to do it.
Here we will use a free plugin called Login IP & Country Restriction By Iulia Cazan
This Plugin is not the only way to add IP restrictions to your website, you can also do it by making changes in core WordPress files, but it is very complicated. That’s why it is better to go with the Plugin.
Install Restricted Site Access Plugin
It is a free plugin. You can easily install it from the WordPress plugin library.
Step 1: Login to your WordPress website >> Click on Plugin >> Add New >> Now Search for Login IP & Country Restriction.
Step 2: Once you get the Plugin, click on Install, and Activate the Plugin.
You have done with the installation.
Login IP & Country Restriction Plugin Configuration
Now you are going to add an additional layer of security on your website. It is imperative to configure it carefully.
Step 1: First of all, go to Plugin>> Installed Plugins.
Step 2: Here, you will get Login IP & Country Restriction plugin >> Click on the setting option.
Step 3: Now, you will be redirected to the setting page. From here, you have to configure everything carefully.
Step 4: On the setting page, you will get multiple tabs. Few options are only available for premium users, but for now, you don’t need it.
Check on “Allow only specific IPs,” Enter the IPs you want to allow, and click on Save.
You are done. From now, only the allowed IPs will be able to login to your website.
Final Words
That’s how you can be protected from brute force attacks on wp-login by changing the default login URL is the most important task, and it is also important to have a good security plugin installed on your website. You can set up Cloudflare DNS level protection if you are using Cloudflare for your site.
We hope this article on how to avoid brute force attacks on the wp-login.php file? helps you. If the article is useful for you in any manner, do share it on social media. If you have any questions, let us know the comment section below.
Stay connected with us for such informative articles.

